
Relining Bugsby's Brakes
June 14-21, 2008
 |
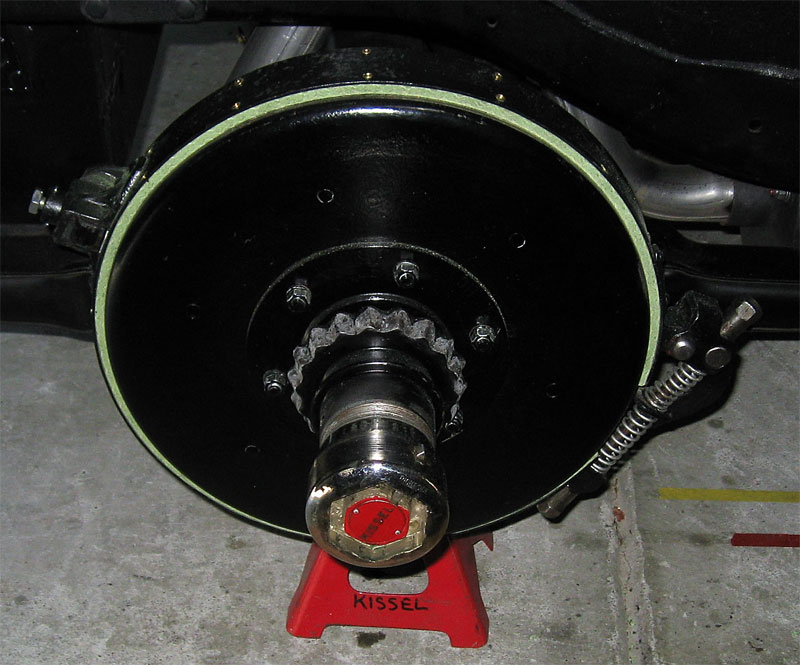 |
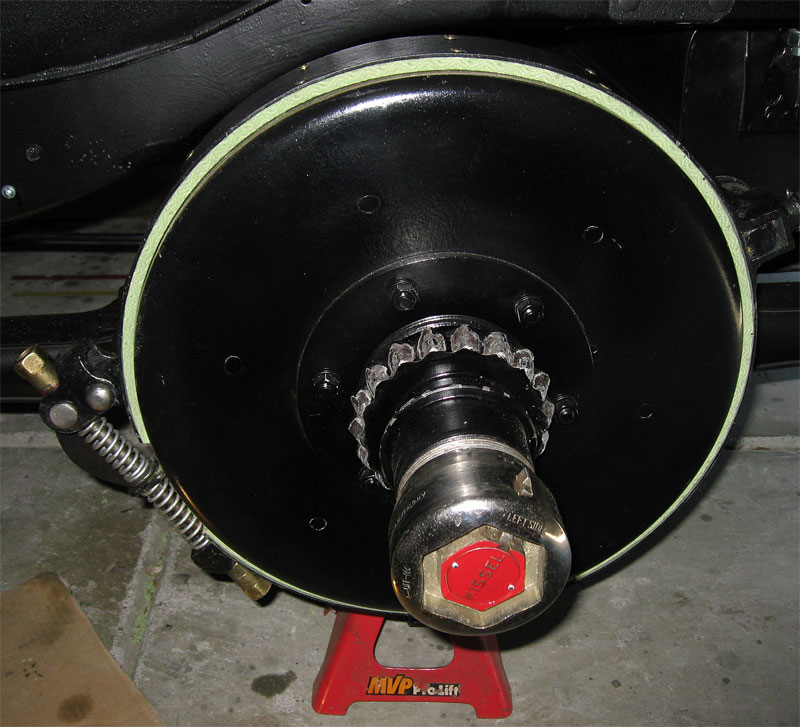
| Final brake assemblies—left side (left), right side (right). (Note the "KISSEL" marked on the red static jack in the right photo. This label refers to the owner of the jack, not the manufacturer of the car!) | |
Jump to:
- Bad Break With Bonded Linings
- How Does One Reline Kissel Brakes?
Removing the Old Linings - Finding the Perfect Lining
- Rivets, Schmivets!
Attaching the Linings
New Linings—A New Life
Bad Break With Bonded Linings
 |
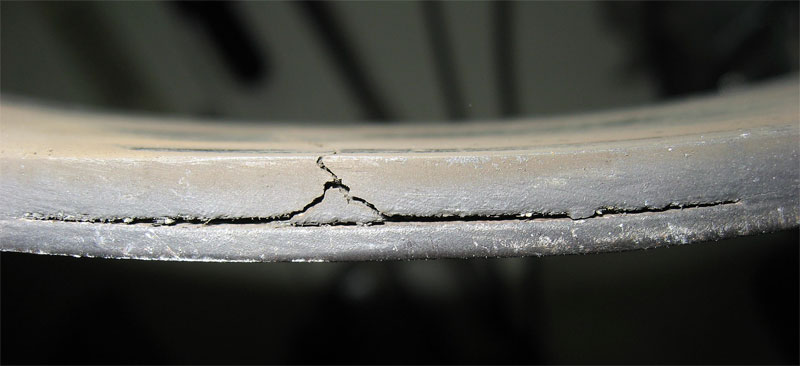 |
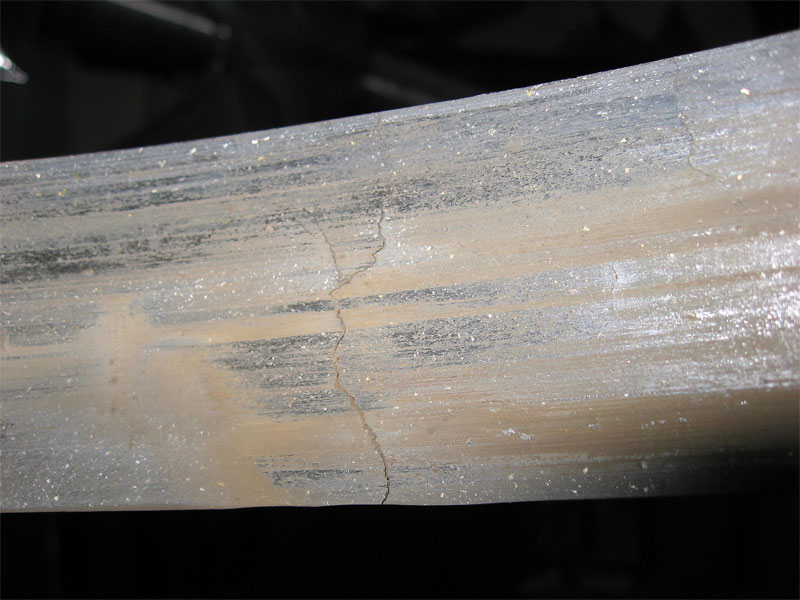
| The right rear brake lining on Bugsby has a bad crack and it squeals like a stuck pig. | |
Lynn has been trying to improve the brakes on Bugsby since he acquired the car in 2005. He has gone through all the linkage and either bought or built new pivot pins. The final problem Lynn needs to tackle is replacing the bonded brake linings.
Lynn was told by the former owner that he thought the modern bonded linings that he had installed were a mistake. Lynn agrees. The linings are too hard and they should be riveted, not bonded. Since the service brake is a large exterior contracting band, the brake band and lining need to be flexible. The hard bonded lining severely limits the flexibility of the brake band compromising the effectiveness of the brakes.
Lynn has tried repeatedly to shape the shoes and cut the linings to make the them conform to the drum with limited success. It is likely that Lynn is responsible for the break in the lining of the right rear brake.
Now, the right rear brake has a loud and unbearable squeal. It's not just a little "I'm a mechanical brake" squeak. No, it's a blood chilling scream that seems like it's capable of waking the dead. It offends Lynn's sense of mechanical manhood to be seen in the car when it screams and he intends to fix it.
How Does One Reline Kissel Brakes?
 |
 |
 |
|
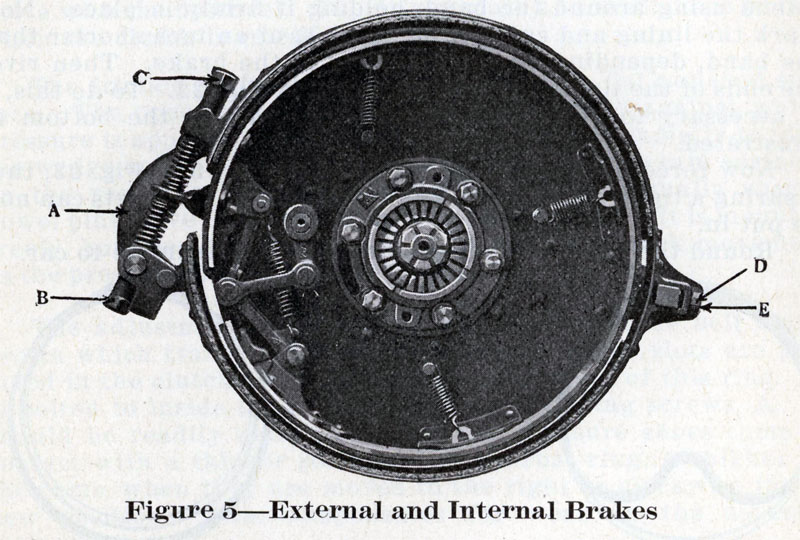
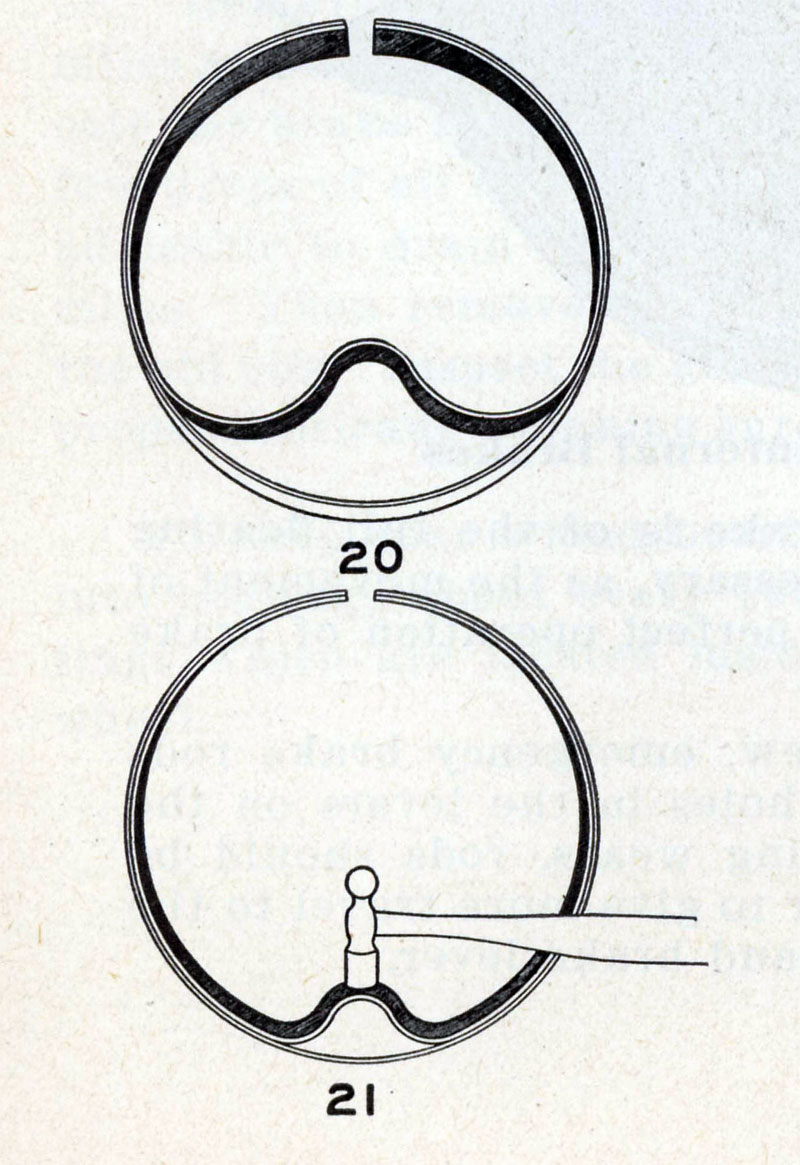
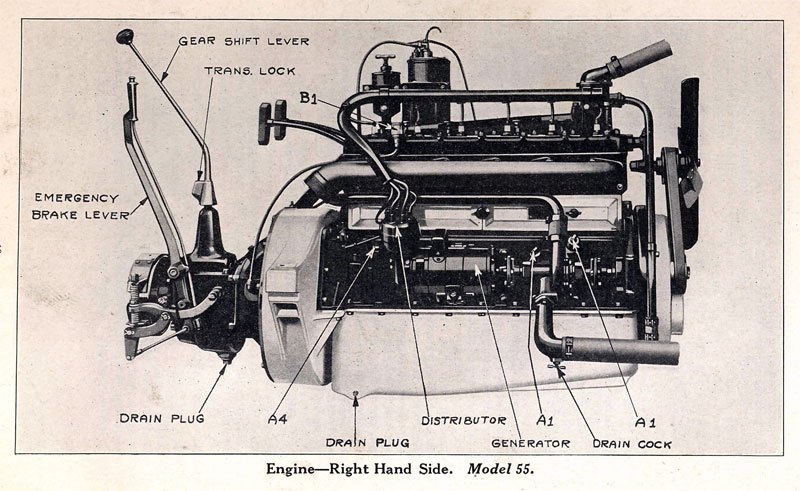
| Figure 5 illustrating the service and emergency brakes (left) and Figures 20 and 21 illustrating the brake relining procedure (center) from Kissel Instruction Book No. 7 (1923). The right side of the engine showing a new location for the emergency brake (right) from Kissel Instruction Book No. 8 (1925). The service brake on Bugsby (1924) is like that shown in 1923 (left), while the emergency brake is like that shown in 1925 (right). | |||
Lynn examines the brake illustrations in Kissel Instruction Book No. 7 for the Model 55 (probably written for the introduction of the Model 55 in 1923) and in Kissel Instruction Book No. 8 for the Model 55 and Model 75 (probably written for the introduction of the Model 75 in 1925). In 1923, the service brakes were only two-wheel rear mechanical brakes and the emergency brake was an internal brake inside the rear brake drums. In 1924, two-wheel rear mechanical brakes were standard, while four-wheel hydraulic brakes were an option. In 1925, four-wheel hydraulic brakes were standard and the emergency brake was located on the rear of the transmission.
The service brakes on Bugsby (a 1924 model) are two-wheel rear mechanical brakes that agree with the 1923 illustration. However, the emergency brake is not like that shown for 1923, but like that shown for 1925. Apparently the emergency brake moved from the rear drums to the back of the transmission in 1924 to support the introduction of four-wheel hydraulic brakes.
Lynn notes another difference as the brake linings on Bugsby are continuous and cover the entire shoe. They are not split into two parts, with a gap at mount point "D" and "E" as shown in Figure 5, above. If one follows the relining procedure illustrated in Figures 20 and 21, the linings will be continuous not split. Lynn thinks it likely that the difference between split and one-piece lining is not important here.
Removing the Old Linings
 |
 |
|
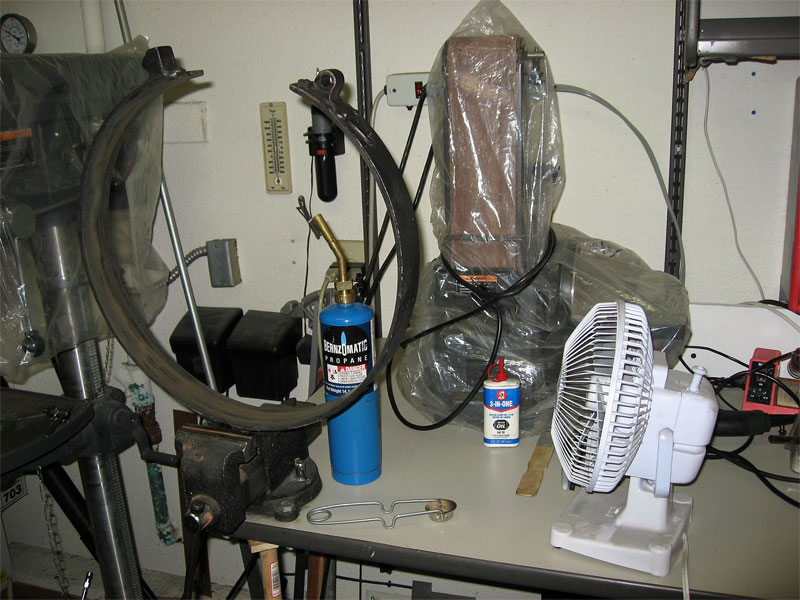
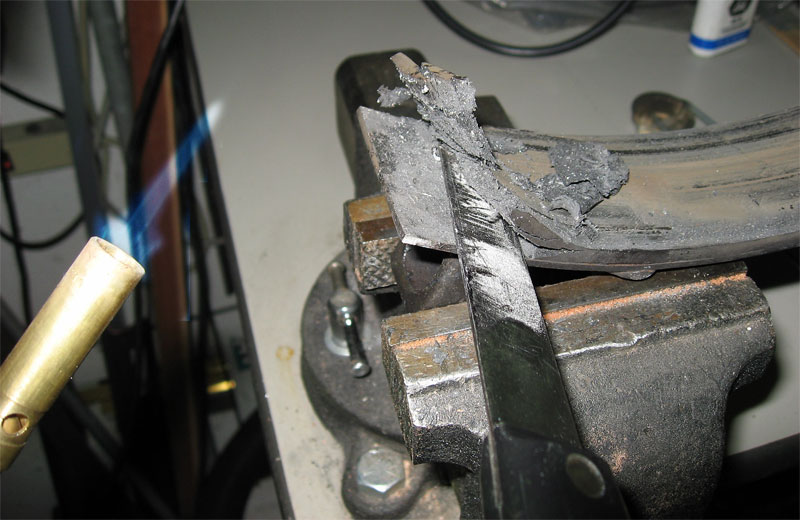
| Using a propane torch and putty knife to remove the old bonded linings. | ||
How should one remove the old bonded linings? While Lynn considered various alternatives, he finds this topic explored on the AACA Discussion Forums. As was suggested there, use of heat will release the epoxy. The discussion suggested using a fan to disperse the noxious fumes. Lynn finds that he really needs to concentrate the heat of the propane torch on the metal band to get the epoxy to release. It probably takes him 90 minutes or more to remove all the old linings.
Using an angle grinder and a wire brush, he thoroughly cleans the remaining epoxy, brake lining, paint and corrosion off the metal bands. After a careful inspection, Lynn paints the bands with an etching primer, then paints the outsides of the bands in a semi-flat black.
Finding the Perfect Lining
 |
|
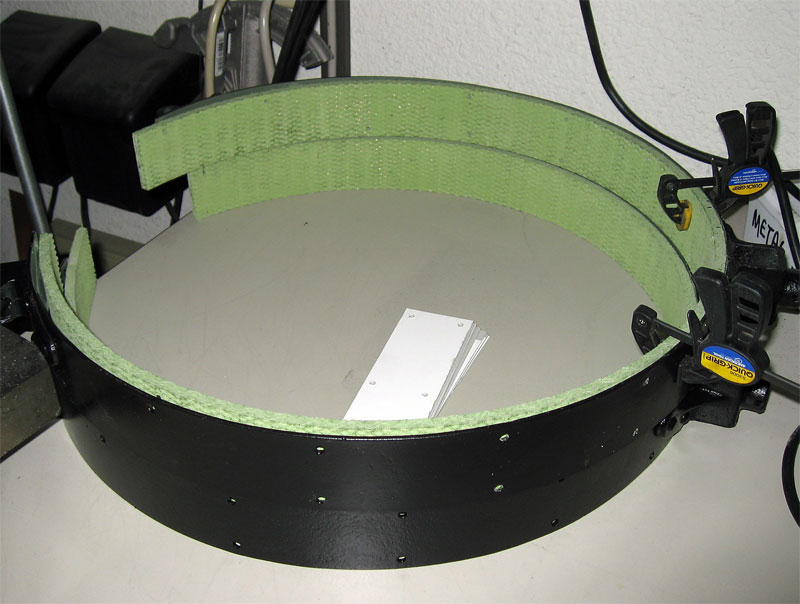
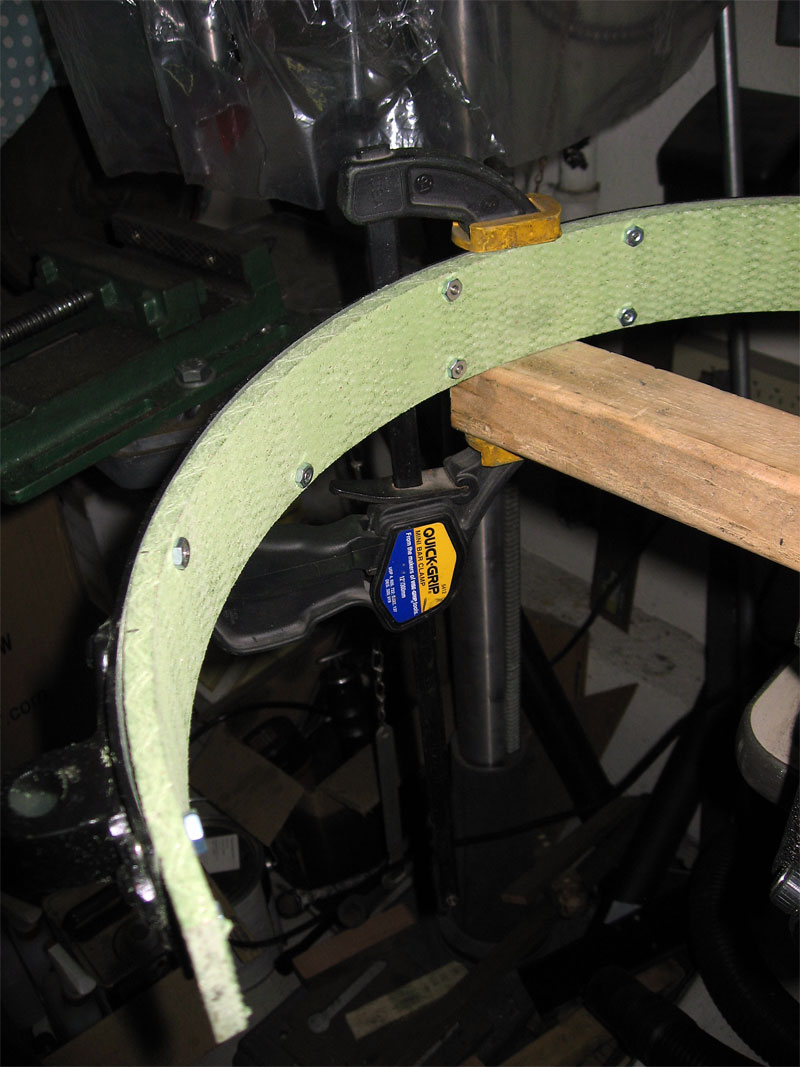
| "Green Gripper" semi-metallic woven brake strips rough cut to length and temporarily clamped to the brake bands. | |
It takes extensive internet searches before Lynn stumbles upon a good source for brake material. He locates a discussion of brake linings for a Stanley Steamer by Pat Farrell. Yahoo! The pointer to the McMaster-Carr site is just what Lynn is looking for. Their semi-metallic woven strips are available in a variety of widths, thicknesses and lengths. The "green gripper" material has brass wire woven into the material which adds strength and improves heat dissipation. Each of Bugsby's brakes requires about 4' and Lynn orders 8' of the 2" wide by 1/4" thick strip.
Lynn can testify to the effectiveness of the embedded brass wire at dissipating heat in the linings. While cutting the linings with a hack saw, heat is quickly transferred to his fingers holding the material some inches distant from the site of the cut. It momentarily surprises Lynn that the heat traveled so fast through the lining—seems like less than 1 second to travel about 2".
Rivets, Schmivets
 |
 |
 |
|
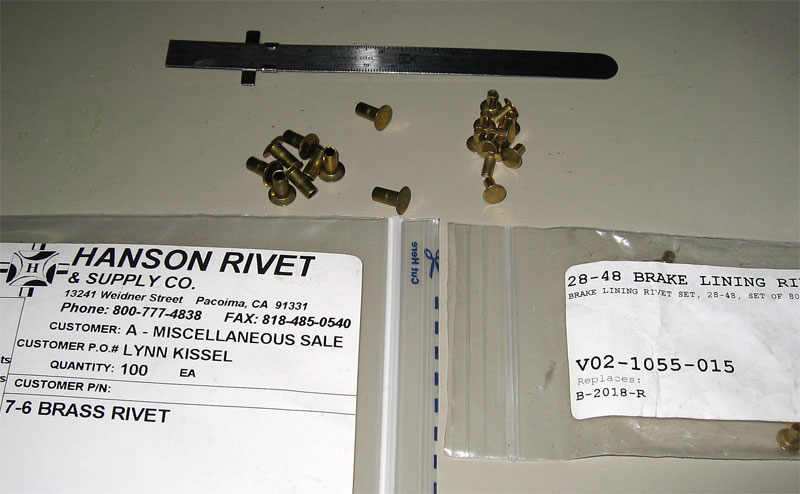
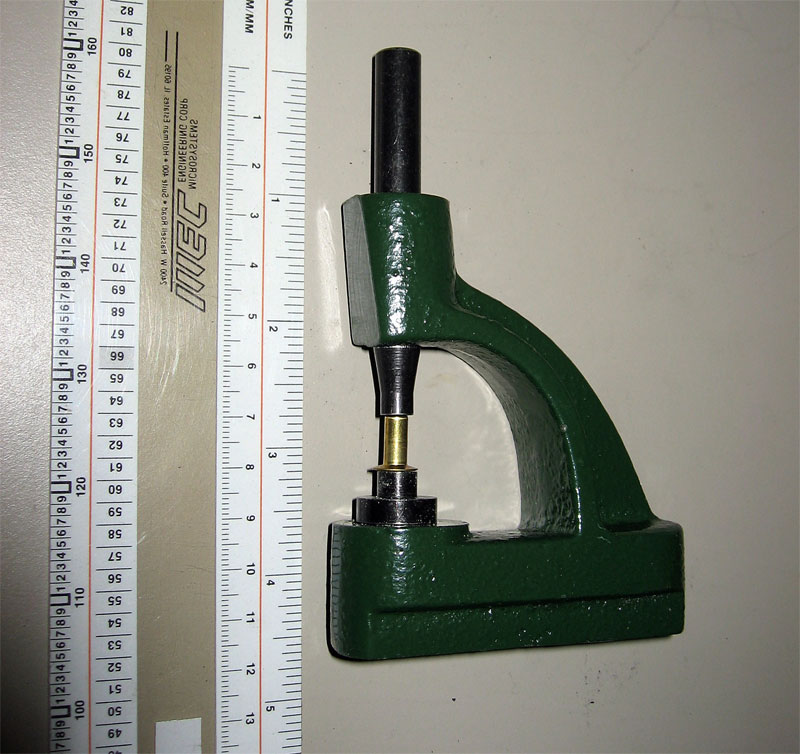
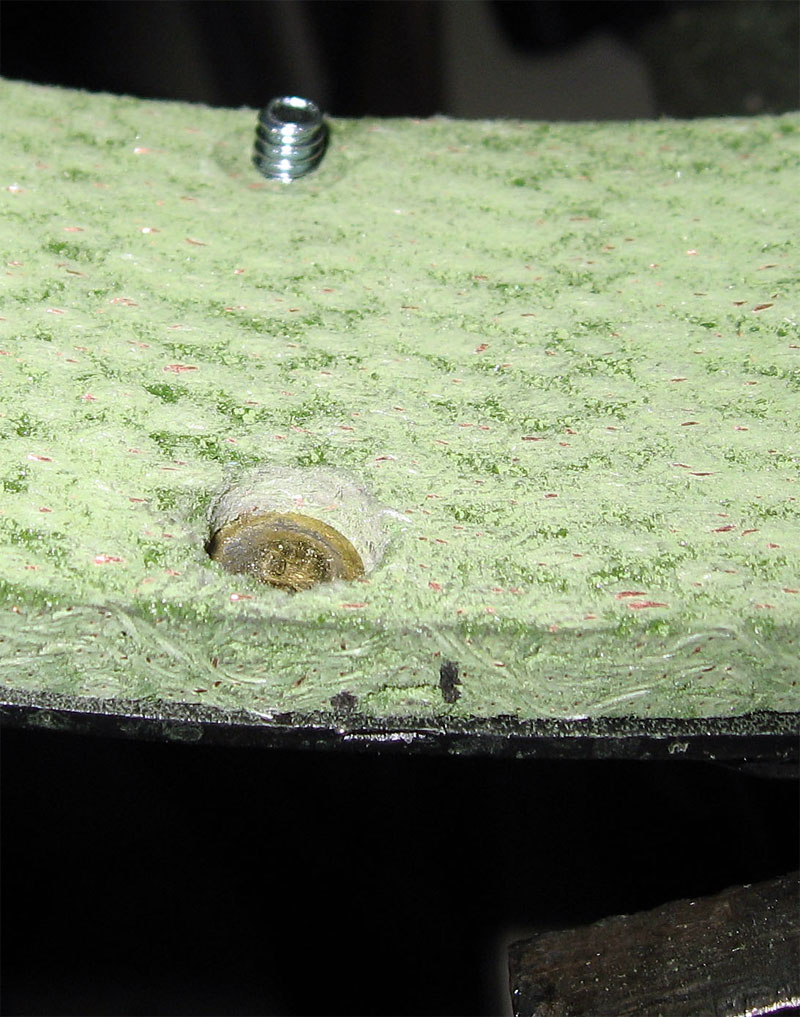
| Model A rivets (1/8" diameter x 1/4" long) prove to be way too small for Bugsby's brakes. Lynn installs 3/16" x 3/8" rivets, compared with the Model A rivets (left, center). A rivet tool (right) makes for a clean installation of the rivets. | |||
Lynn doesn't really worry too much about the rivets, thinking, I guess, that all brake rivets are the same. He orders a bag of rivets for 1928-1948 Ford passenger cars and a rivet tool from Obsolete & Classic Auto Parts.
Once he gets ready to install the new linings he comes to the rude awakening that the rivets he has obtained are way too small for the task. Not only are they too small in diameter, they are too short. Stepping back and studying the issue, he discovers that sizing the rivet is more complicated than he originally thought.
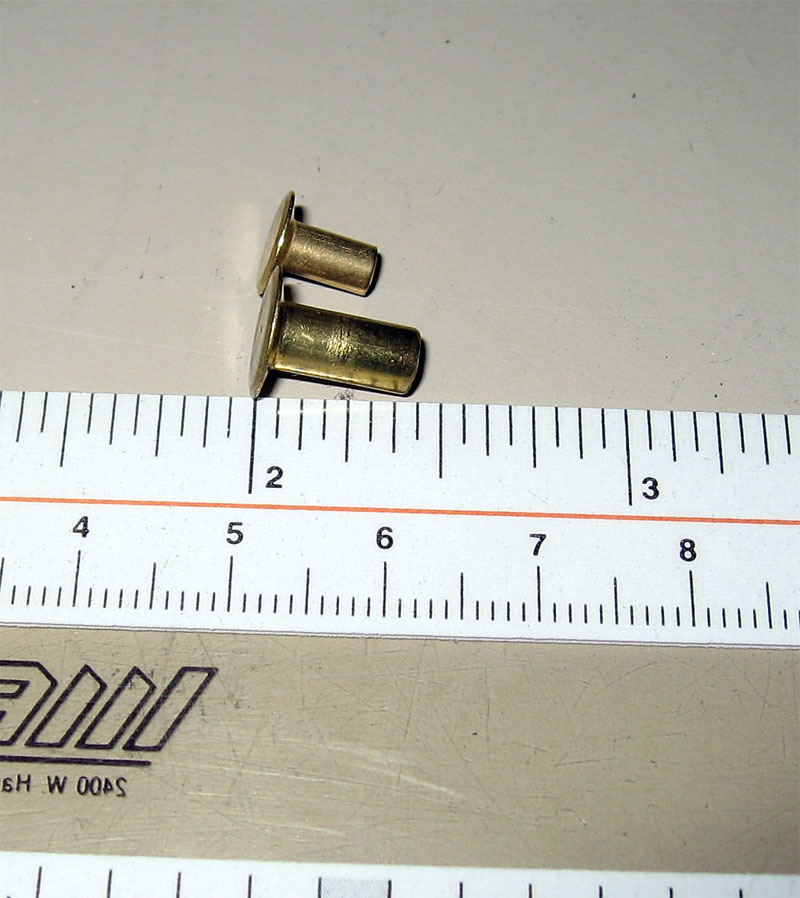
Using twist drills, he measures the existing rivet holes in the bands and discovers that they have a diameter of 11/64". Doing internet searches, he discovers one supplier in England can supply this diameter rivet, but it is not commonly available from most suppliers. As a consequence, Lynn decides to move up to a 3/16" diameter rivet (1/64" larger) and will drill out the holes in the bands for the larger size.
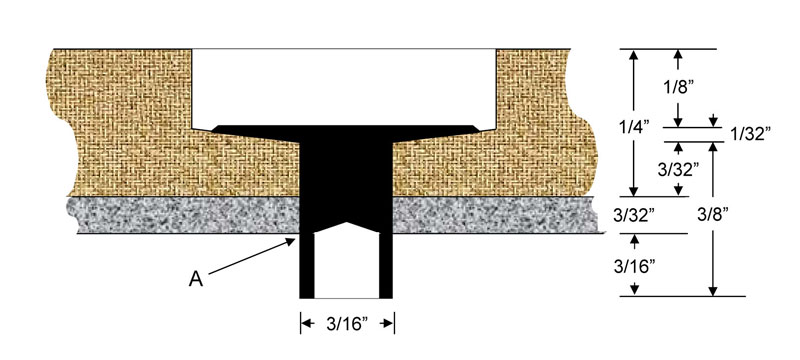 |
| Lynn's analysis of the rivet he needs for Bugsby. |
It takes Lynn some time to understand a critical point about brake rivets, noted as "A" in the diagram above. For strength, it's important that the center hollow tube only extend as far as the back surface of the band. If the tube is longer, the rivet will not be as strong to the shearing force generated when the brakes are applied.
Lynn finds that Hanson Rivet and Supply Co. has a pure brass rivet that exactly satisfies these measurements, and they sell to consumers in 100-quantity lots. Their brake and clutch lining rivet, Part number 7-6, has a body diameter of 3/16", head diameter of 0.359" (23/64"), tube depth of 0.187" (3/16") and overall length under head of 3/8"—exactly what Lynn wants.
Bugsby sits on floor jacks for another week while Lynn waits for the rivets to arrive.
Attaching the Linings
 |
 |
 |
 |
|
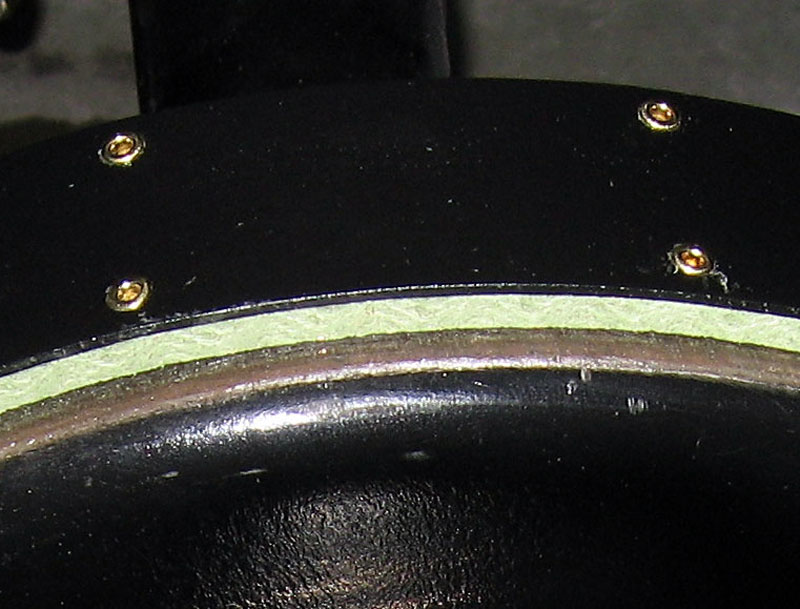
| Stages in riveting the lining to the bands. After drilling the rivet holes with the band and lining in place on the car, #10 screws are used to temporarily position and hold the lining in place. One-by-one, the #10 screws are removed, a 5/32" deep counter sink hole is bored and a rivet is installed. Rivets near the center of the band are installed first, progressively working to the ends of the band. The final result is shown installed on the car in the right-most photo. | ||||
The McMaster-Carr brake material is way too stiff to allow for the installation method detailed in Kissel Instruction Book No. 7—cutting the material long, putting a bend in the middle of the material, attaching rivets at the ends, hammering the bent lining against the band, and installing the remaining rivets.
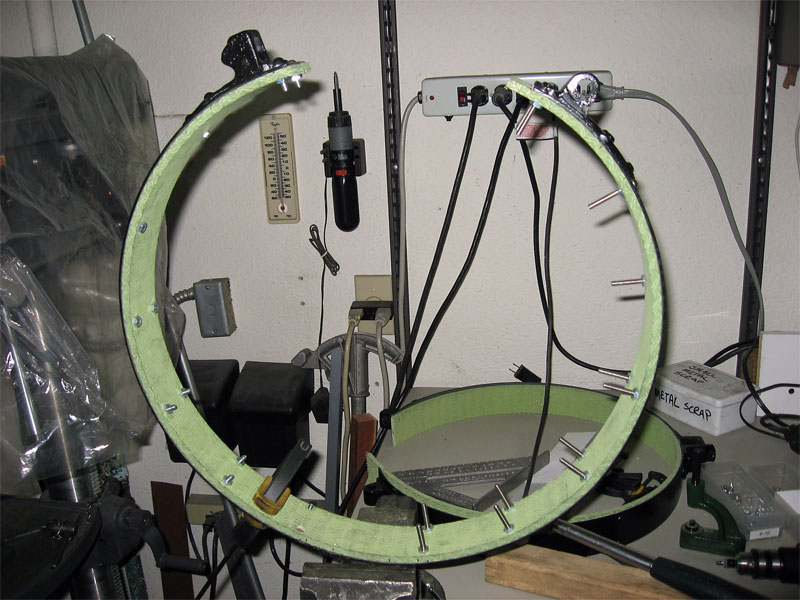
Instead, Lynn places a 0.030" thick by 2" wide by 48" long strip of cardboard around the brake drum, puts the new (loose) lining around the drum outside the cardboard, then places the brake band over the new (loose) lining. He uses a clamp to tighten the band, forming a band, lining, cardboard sandwich around the drum. The 0.030" thick cardboard is used to establish the amount of clearance that should exist between the lining and drum in the final installation.
Once the lining is properly aligned with the band, Lynn uses a drill motor with a 3/16" twist drill to cut rivet holes in the new (loose) lining using the rivet holes in the band as a guide. He's careful not to drill into the drum. Then he removes the clamp and parts from the car and moves to the workbench. With this procedure, Lynn thinks he's precisely predrilled the lining at the exact locations where the rivets need to be installed in the band at the perfect arc to match the surface of the brake drum.
Using #10 screws and multiple soft-faced clamps, he temporarily attaches the lining to the brake band using the predrilled rivet holes. One-by-one, Lynn removes a #10 screw, drills a 5/32" deep countersink for the rivet head, and installs a rivet. He starts the installation of rivets near the center of the band and progressively works his way out to the ends of the band. In a sense, exactly the opposite of the way the Kissel Instruction Manual suggests that new linings be installed.
The new linings, riveted to the bands are now installed on the car. As he had hoped, the bands are shaped to nicely match the arc of the drums and little additional fiddling is required to obtain a good adjustment.
New Linings—A New Life
 |
|||
| A 1954 comic illustrates Lynn's new confidence in driving Bugsby around Livermore. | |||
Lynn is very pleased once the car rolls out onto the street. The brakes are QUIET and very little pedal effort is needed, just like Pat Farrell promised on the Stanley Steamer site. Hot dang!
After living three weeks with the new linings, Lynn is still very pleased. In only a couple of isolated instances has Bugsby's right rear brake managed to give out a little squeak. This was the brake that had been giving Lynn such grief previously.
Just as important, since the new woven linings are a lot softer than the previous bonded linings, and the linings are riveted to the band so that the assembly is more flexible, the application of the brakes is more easily modulated by the operator.
Lynn has had already had at least two "panic" stops with the new linings. In each case he could clearly hear the rear wheels just barely starting to squeal against the pavement, announcing their impending lock-up, and easily backed off the pedal just enough to maximize the stop while minimizing the tire noise. Nothing short of outstanding!
Under these circumstances with the old linings, he would have come to a loud, screeching halt. When he's had panic stops like this in the past, he's actually seen people come out from their back yards to see who may have been killed in what sounded like a full-up accident.
Lynn is once again happy to drive Bugsby around town without the fear of emitting blood curdling screams from the brakes. His mechanical honor has been redeemed.
A way big thanks to Pat Farrell with that tip about "green gripper" linings!
Contact
 with your comments or questions
Copyright © 2018 Lynn Kissel
Last updated: May 24, 2009